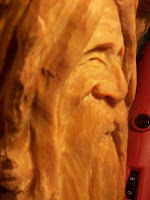
 Here I have changed tools and started working with a rounded bit under the eye brows and the top of the eye lids. I have gone a little deeper and slightly smoothed out the top of the nose bridge.
 If you look closley you can see here how I have now cut around the sides of the nostrils rounding them. Also I have smoothed out the cheeks and have clipped off the front of the nose to give it more of a rounded appearance.
Now I am checking with my best buddy Ben to see if he approves...he usually get me a bark or waggs his tail for me to continue.
 In this next photo I have cut into the nostrils to put in the breathing holes. Then the top of the mustache is rounded and cut a little deeper smoothing off to each side from the center, and downward towards the neck. I have also left an area under the moustache for a mouth, or lip. In addition I have grazed the top of the forehead with a couple of wrinkle lines.
 Now I have begun working on the eyes, which seems to be the hardest part for most beginning carvers and it can take many trys to get them right fortunatly you can most alway cut deeper if you make a mistake. First I cut the lid area being careful not to cut any of the area underneath till I have determined there exact size. Here I sometime take a pencil and draw in the pupil to check the expression and make sure it is what I want. You may have to erase it and move it several times. When you get the placement how you want it, cut slowly and carefully, just a little at a time. When you are happy with the results then you can round out the bottom of the eye and taper it appropriately.
 I have also cut lightly above the eye brows and slightly down the top of the nose
Now the hair and moustache are rounded out and detailed. I have also cut deeper around where the forehead and hair meet to accentuate and make it easier to see.
I have gone over this all very breifly as to just help you get an idea of the sequences involved and to help get you started...which is the most important part...just get started.


If you get a chance you can look at or purchase some of my other knothead carvings at my E-bay Store and Auctions at http://stores.ebay.com/Feather-River-Krafts-and-Carvings_W0QQsspagenameZMEQ3aFQ3aSTQQtZkm


No comments:
Post a Comment